How to build an automated solution


 Power Automate is an online workflow service that automates actions across the most common apps and services. For example, you can create a flow that adds a lead to Microsoft Dynamics 365 and a record in MailChimp whenever someone with more than 100 followers tweets about your company. Microsoft Power Automate is all about process automation. Power Automate allows anyone with knowledge of the business process to create repeatable flows that when triggered leap into action and perform the process for them.


Important concepts in Microsoft Power Automate

Keep these concepts in mind when building flows:

Every flow has two main parts: a trigger, and one or more actions.

You can think of the trigger as the starting action for the flow. The trigger can be something like a new email arriving in your inbox or a new item being added to a SharePoint list.

Actions are what you want to happen when a trigger is invoked. For example, the new email trigger will start the action of creating a new file on OneDrive for Business. Other examples of actions include sending an email, posting a tweet, and starting an approval.

Some examples of types of actions you can have in a flow include:

Loops – Runs an action until conditions are met to move to the next step of the flow

Switch – Identifies a single case to execute based on the evaluation of input

Do Until – Executes a block of actions until a specified condition evaluates to true

Apply to each – Executes a block of actions for each item in the input array

Expressions – underlying definition that describes the actual logic that runs in your flow that can be manually written

You can also perform data operations in your flow, such as Compose, Create CSV table, Join, or Select. These concepts will come into play later when you build your own flows from scratch.

Trigger or run the flow


Create a flow from a template

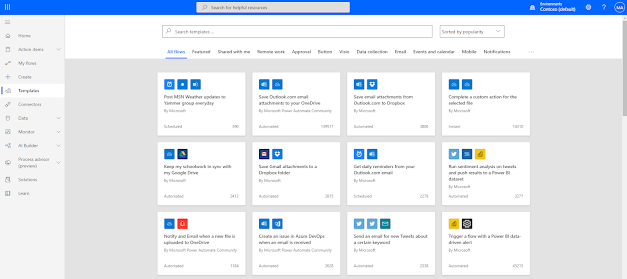
          With the hundreds of triggers, actions and connectors, sometimes the hardest part about Power Automate can be figuring out where to get started. To help you get started, there are countless flow templates available to help you build a solution. To see all of the available templates, you can sign into Power Automate and select Templates from the left-hand menu.


        From here, you can search by a specific word or phrase like "Dataverse" or you can browse based on category.

If you click on a specific template, you will see details about the template including the data sources it will connect to.


EX.

 Create an approval request flow

1.Sign in to Power Automate, and then select Templates.

2.Search for and select the Post list items to Twitter after approval template.

3.Make sure that your account credentials for SharePoint, Approvals, and Twitter are correct, and then select Continue.


4.Back in Microsoft Flow, in the When a new item is created action, enter the following values:

            *Site Address: Enter the URL of your team's SharePoint site.

            *List Name: Select ContosoTweets.


5.In the Start an approval action, select Edit to show all the fields.


6.In the Title field, enter New tweet for, and then select Title in the dynamic content list.


7.In the Assigned to field, enter and select either your name or the name of a test user.


8.In the Details field, remove the default items, and add TweetContent, TweetDate, and Created by DisplayName from the dynamic content list. Add the words on and by to make the content more readable, as shown here.


9.In the Item Link field, paste the URL of your SharePoint list, which you copied in the previous procedure. In the Item Link Description field, enter Contoso Tweet List.


10.In the Condition action, hover over the IF YES box, select the plus sign (+), and then select Add an action.


11.Search for update item, select the SharePoint connector, and then select the SharePoint – Update item action.


12.In the Site Address, enter the URL of the team's SharePoint site again. In the List Name field, select ContosoTweets again. In the Id field, add ID from the dynamic content list. The Id field is used to match the actual tweet request in the SharePoint list.


13.Select the Title field, and then, in the dynamic content list, search for title. Add Title from the When a new item is created action.


14.In the ApprovalStatus field, select Yes. Then select the ApproverComments field, and add Comments from the dynamic content list.


15.Near the bottom of the IF NO, DO NOTHING box, select Add an action.


16.Repeat steps 11 through 14 to create a SharePoint – Update item action. Set the same values that you set for the IF YES condition. The only difference is that you set the ApprovalStatus field to No this time.


17.Select the Post a tweet action, and select Edit. Then select the Tweet text field, and add TweetContent from the dynamic content list. This step will create the actual tweet and then post it to Twitter when it's approved.


18.Select Save.

Congratulations! You just created your  approval flow.


Comments

Popular posts from this blog

Configure forms, charts, and dashboards in model driven apps

Create and Manage tables in Dataverse

Use the Admin center to manage environments and data policies in Power Automate